Remote Controllable Drain Valve
Up until late September, I provided an in-line flapper valve in the primary drain line to help control the flow rate and provide for silent and bubble-free operation. This worked fine until you needed to adjust it after a few weeks; the nylon thumbscrew would expand and seize up in the hole.
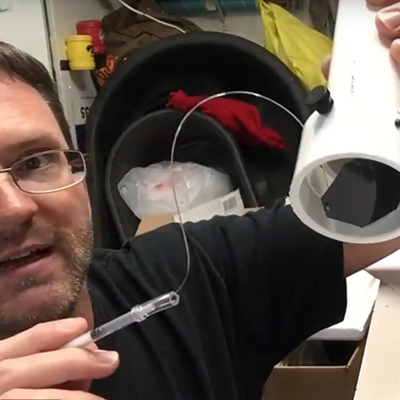
I now include a drain control valve that attaches to the end of the center-most drain pipe. The purpose of this valve is to induce a full-siphon flow on the drain in order to have silent operation. The flap position is controlled by means of a syringe with a monofilament line between the flap and the syringe. It comes pre-configured for use when you have unobstructed access to the drain underneath the scrubber.
In this case, the basic installation is simple:
1) Cut the center-most drain pipe such that the end of the pipe is approximately 1/2″ to 1″ below the surface of the water
2) Remove the pipe (for ease of valve installation)
3) Attach the coupler to the end of the drain pipe by tightening the thumbscrews. Make sure that the syringe is above the coupler.
4) The tip of the syringe barrel has a 1″ piece of tubing attached. Push this tubing into the gap between the drain pipe and the coupler.
5) To adjust the position of the flap, pull the syringe plunger out.
6) To lock the plunger into position, slide the black sheathing on the plunger down until it makes contact with the barrel. This will hold the plunger in position, thus keeping the flap in the desired position.
I recommend pulling the plunger out as far as possible (close the flap completely) and then pushing the plunger in about 1/4″, and then applying flow to the scrubber. Depending on the flow rate, you may need to adjust the position of the syringe/flap in order to eliminate any unwanted drain effects, such as gurgling, flushing, and bubbles. A 1.5″ pipe allows a great amount of flow at full siphon, so you will likely need to close the valve/flap nearly completely closed to induce a siphon on the center drain.
Note on bubbles: a new scrubber (with no growth) will tend to produce bubbles for a period of time. Focus on eliminating noise first – once growth starts filling in the screen, the bubbles will become much less. If bubbles are a problem, take the nylon filter bag and place this over the drain and tighten down around the top of the coupler, using the thumbscrews as the “hanging points” – only tighten the filter bag enough so that it hangs on the thumbscrews, but is not tight around the drain pipe (allow a gap for water to freely flow out of the top of the drain). If possible, the coupler should be positioned such that the top of the coupler is slightly below the water level, with the filter bag at the water level.
If you do not have direct unobstructed access to the drain, then you will need to customize the connection between the drain and the syringe. For this purpose, an additional 12″ of tubing and 4′ of monofilament line in included.
What follows is a step-by-step instructional guide for how to customize and use the new design, which involves using a small syringe that is attached to the flapper valve via a mono-filament line (50 lb test fishing line).
First thing to do is to watch this 3 minute video that explains how it works so you can get a visual of what needs to be done:
* don’t forget to Subscribe to my YouTube Channel for more updates, including a future instructional video that follows the steps below.
1) Determine Syringe Location
Decide where you want the syringe in order to determine how much tubing you will need.
For this remote-control scenario, you may need to mock up the drain pipes, but not necessarily. What you need to determine is the distance between the operating water level of the sump (where the primary drain line is located) and the position where you want the remote syringe – then, cut the hose to that length and proceed to the next step.
2) Setting up the syringe
Cut the line between the syringe and the flap and remove the line from both pieces.
Remove the plunger from the syringe body. Thread one end of the fishing line through the black sleeve on the plunger (between the sheathing and the plunger shaft).
Next, there is a little hole in the syringe plunger shaft, near the top (flat circle). Thread the fishing line through that hole so that it sticks out a few inches.
The next step involves creating a “ball” on the end of that line by touch the end of the line with flame from a lighter. Before you do this, it’s important to cover a couple basic safety items, especially if you have never burned plastic with flame before.
A) Melted plastic will stick to anything it gets on and will continue to remain melted (and hot) for several seconds. Do not allow melted plastic to drip onto your skin or clothes, but if it does, don’t wipe it up with you hand as it will stick to your hand. Now granted, we are talking about a very tiny amount of plastic, but it can still burn you.
B) Touch the end of the line with flame only briefly (far less than a half a second) to the end of the line that you just pushed through so that it starts to turn into a little “ball”. Immediately after flame contact is removed, blow on the “ball” to ensure that it is not on fire, then continue to blow on it, and do not touch the melted plastic at all for at least 30 seconds after flame contact.
C) You can repeat this process until the “ball” is about the size of a small pinhead so that the line cannot be pulled through the hole in the syringe shaft.
D) Avoid making flame contact for a long enough period to cause the line to start bubbling and crackling (i.e. it is on fire), and if you do, blow it out immediately and watch for any dripping.
E) don’t let this freak you out. Practice a few times if you need to, I have provided additional line in case you mess up 5 or more times…
So with all that taken into consideration, create the ball on the end of the line, then pull the other end of the line to remove the slack and pull the “ball” against the hole in the plunger shaft.
3) Re-assemble the syringe
Take your cut piece of vinyl tubing and push one end of it up on to the syringe body until it goes up over the tip and on to the main body of the syringe, just enough so that it stays in place (maybe 1/8″)
Feed the fishing line through the syringe and attached tubing, and take up most of the slack. Slide the black piece of sheathing on the syringe shaft to the top of the plunger, then push the plunger back into the syringe, keeping the line tight as you do it.
4) Assemble the drain
This is a bit easier to do before you have installed the scrubber drain, but you can prep the drain pipe ahead of time if you want. Preparation is really only needed if you have to control the drain remotely.
Cut the primary drain pipe so that when installed, the bottom of the pipe is between 1/2″ and 1″ under the surface of the water.
The valve is in the bubble blocker (the 2″ coupler with thumbscrews). With the thumbscrews on top, slide the bubble blocker on to the end of the drain pipe and tighten down the 3 screws until all are snug.
Feed the fishing line down between the blocker and the pipe near the location of the tip of the flapper, and feed the line through the tiny hole on the tip of the flapper.
5) Trimming the line and adding a second “ball”
Push the open end of the tubing that is attached to the end of the syringe into the gap between the bubble blocker and the pipe so that it is snug. Do this right above where the flap/hole is. You should only need to push it in about 1/2″.
If it’s not already, push the syringe plunger all the way in.
Hold the assembly vertical, and let the flap hang in lowest position (you may have to jiggle it and pull it down)
Make sure that you have removed all the slack in the fishing line, then make a “kink” or a mark on the line at a point about 1/4″ past where the line has passed through the hole in the flap.
Next, invert the assembly and let the flap sit closed.
Cut the line at the kink or mark point
Burn a ball on to that end (see process ans safety precautions above)
That’s it! You are done! Pull up on plunger to close valve, push the plunger to open the valve. It will not operate that great out of the water, but with flow pushing against the valve flapper, it will operate smoothly.
Once you have installed the scrubber and water is flowing, pull the syringe out in order to close the valve to the point where the drain stops gurgling and/or flushing, and you have reduced bubbles to a minimum (you will not be able to completely eliminate them initially – that is what the filter sock is for).
Once you have determined the best position for the syringe, slide the black sheathing that is around the plunger shaft down until it hits the syringe body. This locks the syringe in place.